Showing posts with label Bread Baker's Apprentice Challenge. Show all posts

Thursday, August 13, 2009

English Muffins - BBA Challenge #12

Week 12's Bread Baker's Apprentice challenge is English muffins.

I decided to join in the fun that some of my fellow bakers were having by doing a bake off / throw down between two recipes.

Anyone who knows me, knows I'm a BIG fan of Rose Levy Beranbaum and her Bibles. Not only does she write very detailed cookbooks but she's also very supportive & giving to those on her website. I used her English Muffin recipe out of the Bread Bible (BB) and I had no doubt that her recipe would beat Peter's Bread Bakers Apprentice (BBA). But did it?

Both recipes came together quickly. The Bread Bible used a sponge that you can leave overnight in the refrigerator should you choose. Then mixed and baked the next day. The BBA used a direct method that took 4 hours from beginning to end.

The BB dough is rolled out and cut with a large biscuit cutter

While the BBA is shaped like a dinner roll.


BB's rising on corn meal

BBA's after rise


Both are cooked on the griddle until dark brown on both side.


BB's
BBA's

The BBA's is placed in the oven for 5-8 minutes to finish baking.
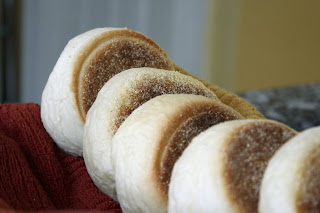
Final product: BB


BBA's


Crumb shots:
BB's
BBA's

So which one did we like best?
Much to my surprise, I liked BBA's. The BB had a slight sour dough taste which some may find appealing.

Thursday, July 23, 2009

Cranberry-Walnut Celebration Bread - BBA Challenge #11

If you like cranberries and walnuts, this week bread is for you.

This dough can be baked in a loaf pan, as freestanding boules or braided.
The braids stacked on top of each other:

Here, the top braid listing to the left. I tried to encourage it back to the right before popping it in the oven but it wouldn't budge.

The crumb shot. This bread had a lot of cranberries and walnuts. It tasted great plain or toasted.
Up next... English muffins.

Thursday, July 16, 2009

Corn Bread - BBA Challenge #10

Being a true southern girl, I'm not allowed to make corn bread unless it's in a well seasoned iron skillet. I believe my grandmother would turn over in her grave if I even thought about it.

Although I was raised with cornbread at every meal, it was never my favorite.... until now. This corn bread is amazing. Moist, sweet, and with lots of bacon. It's almost a meal in itself.

We start this recipe by soaking the polenta overnight in buttermilk & leaving it covered on the counter. I was a little hesitant to leave it on the counter overnight but when I checked it the following day, it still smelled fine. hmmm. Interesting.


I mixed the baking powder, salt and baking soda with unbleached AP flour.
Added the white and brown sugar.


My mess-in-place....

I mixed all the liquid ingredients in well then added the corn. (note to self, defrost the corn first! duh!)

The directions state that the corn bread cooks in 30 minutes.... After 55 minutes, with an internal temp of 160, I grab it out of the oven, wrapped in in heavy foil, and put it in a short, thick box and drove off with it. I was five minutes late to Bible study... and I was the one with all the food. Boy were people glad to see me! :-D (I believe the frozen corn is why it took so long to cook. What was I thinking?)

The corn bread was still moist inside but not raw. (whew!) Everyone loved it. I had to hide a piece to take home so I could have a crumb shot.

How good was it? Rick requested it for breakfast! (is that man after my heart or what?)
(Yes, we ate more than just corn bread for Bible study...but that's another post...)

Coming up next.... Cranberry-Walnut Celebration Bread.
What are you waiting for? Buy a copy of Peter Reinhart's The Bread Baker's Apprentice and join us. We're a friendly group.

Sunday, July 12, 2009

Cinnamon Raisin Walnut Bread- BBA Challenge #9


I decided to play with this recipe a bit to see if I could develop a deeper flavor. I created a sponge using part of the ingredients. (1/2 cup buttermilk, 3/4 cup water, 1 1/4 cup bread flour, 1 tsp yeast, 4 tsp sugar) I whisked it for 1 minute than covered the sponge with the rest of the dry ingredients minus the salt. (2 1/4 c flour, 1 tsp yeast, 1 1/4 t cinnamon) Typically, I'd let this sit at room temperature for one hour than put it in the fridge over night but I ran out of time so I let this sit at room temperature for four hours before mixing. Below you see the sponge breaking through the flour mixture.

After four hours, I added the egg and shortening and mix with the dough hook for 1 minute to for a rough dough. I covered the bowl and let the dough autolyse for 20 minutes.

After 20 minute autolyse:

I added the 1 1/4 t salt and mixed on KA #4 for 6 minutes

I added the raisins and walnuts in the last minute than finished the kneading by hand.

The dough doubled in 1 hour


I didn't have an 8x4 pan, so I shaped 2/3 of the dough and placed it in my 9x5 pan
Here's the dough after 90 minutes, ready for the oven. To reduce gaps in the cinnamon spiral, I let the dough overproof so I wouldn't have much of an oven spring.

Final bread cut in half

With the extra dough, I made small cinnamon rolls.


Finished rolls.


Rick has been on pins and needles waiting for this week. He loves raisins. He really enjoyed this bread. Rick said the bread was light, chewy and soft with a slight molasses taste.

Wednesday, July 1, 2009

Cinnamon Rolls - BBA Challenge #8


Here we are at week 8 of the Bread Baker's Apprentice Challenge. We are baking our way through Peter Reinhart's book "Bread Baker's Apprentice" in the order recipes appear in the book.

I have been looking forward to this week. So much so, that I even turned my brioche in week 4 into cinnamon buns. I wonder what other doughs I can turn into cinnamon rolls? :-)

I must say, the lemon zest in this recipe made the most wonderful smelling dough ever!

I rolled the dough out into a 12 x 14 square. (that left corner was being a pain)

I spread egg whites over the dough to hold the cinnamon sugar instead of butter. (a tip I learned from Rose Beranbaum) I also used my own cinnamon sugar recipe instead of Reinharts (3/4 c dark brown sugar, 1/4 white sugar, 2 t Vietnamese Cassia Cinnamon, and a pinch of salt)


To avoid distortion, I used a piece of white thread to cut the slices. (slide the thread under the dough, pick up the right thread with your right hand, the left with the left, going over the top of the dough, move the right thread to your left hand and the left to your right hand. Now, at the same time, pull the thread in your right hand to the right and the thread in your left hand to the left)

Violia! A perfect slice

Place the slice piece on a Silpat or parchment paper lined cookie sheet.


I covered them and placed them in the refrigerator until 2AM

I popped them into the oven at 5:30 sharp, baked for 25 minutes then cooled them on a rack for 10 minutes.

I iced them using a poured fondant, snapped a few pictures, then handed them to my husband to take to his 6:15 Bible study. Ummmm. These smell awesome.
I relaxed, thinking I had safely escorted all the calories out of the house but not so. Rick stopped by on his way to work with a left over roll. (he knows they are my absolute favorite. Wasn't that sweet of him to go out of his way?)


Sigh.... I pour myself a cup of coffee, sat in my favorite chair and savoured each calorie. Thanks Honey!


You can find the recipe here (I had to add an additional 6 TBS of bread flour)

Here's a video of using dental floss to cut the rolls:


Friday, June 26, 2009

Caramelized Onion and Herb Ciabatta - BBA Challenge #7

I've been dreading this bread since the beginning of this challange. The thought of working with a wet dough was a bit intimidating. However, it turns out that it wasn't as difficult as I thought it would be. Isn't that the way it always is? Let's pretend you said yes. We fear the unknown but once we do it, we wonder what the big deal was.

I had the choice of two pre-ferments to use with this ciabatta recipe... a poolish or a biga. I've never made either one so I chose the first one that appeared in the book. The poolish is made a day in advance and cools it's heels in in the fridge overnight while it develops all that wonderful flavor.

My first poolish. Isn't it cute? It's smells wonderful. ...well, for poolish anyway.
While the poolish was warming up from it's over night stay in coolville, I sliced 4 cups of vidalia onions and put them over medium heat to caramelize.
Once the onions started turning brown, I added a couple of TB of sugar, let them carmalize a little more, than added the balsamic vinegar.

While the onions were carmelizing, I chopped up parsley and basil fresh from my herb garden. I tossed them in with the onions and balsamic vinegar until they wilted. I put the mixture to the side to cool while I mixed up the dough.

The dough was fast and easy to mix. Stir the flour, salt and yeast together, add the poolish and water. Mix for 7 minutes. I had to use the maximum amount of water plus 6 more TBs to get the dough to clear the sides but stick to the bottom as Peter describes in his book.
I poured the wet stretchy dough onto a generously floured table.
I pushed it out into a rectangle, floured the top and made the first stretch & fold. I let it rest for 30 minutes.
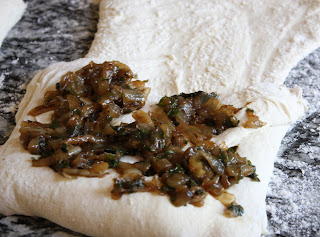
The book says to fold the onion mixture in at the second stretch & fold 1/4 at a time depending on how many loafs you were making... Ummm, so he's assuming the dough is divided into separate loaves already. Yet the instruction do not divide the dough into loaves until the shaping stage. What to do, what to do? I decided to divide the dough before the second fold and folded in the onion mixture. In the picture below, I have 1/4 of the onion mixture under the flap and 1/4 on top of the flap. I folded the last flap on top of the onions and let it rest 2 hours
Should I have waited to fold the other 1/4 of the onion mixture in at the last stretch and fold after the 2 hour rest? I have no idea.

One more stretch & folded and onto the couche they go. Don't they look cute?
It was a little tricky getting the dough to the pan after the proofing stage on the couche. Next time I will use parchment paper under the dough before putting them on the couche. Since they were so big I had to bake them separately. One loaf proofed for 45 minutes, the other for 65.
The finished loaf
A crumb shot

and another

This was very tasty and had a great chew.

What I learned:
  • Use more water for bigger holes
  • Use AP flour for bigger holes
  • brush excess flour from dough before stretching & folding
  • Use a parchment sheet before putting them on the couche
  • Cut the recipe in half

For your viewing pleasure, here's someone demonstrating making ciabatta with a different recipe.